
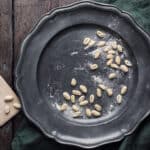
Gnocchetti or gnocchi Sardi is a kind of pasta essentially made from 2 ingredients, semola flour, and water. It is incredibly easy to make and it will be ready in no time. I am sure it will be your favorite homemade pasta to make. I like to serve them with my deliscious beef ragu or with my creamy white ragu with pancetta and ground beef.
Gnocchetti Sardi has an external ribbed texture with an internal hollow given by the wooden gnocchi board. Its particular shape is perfect for trapping the sauce inside, increasing its flavor at every bite.
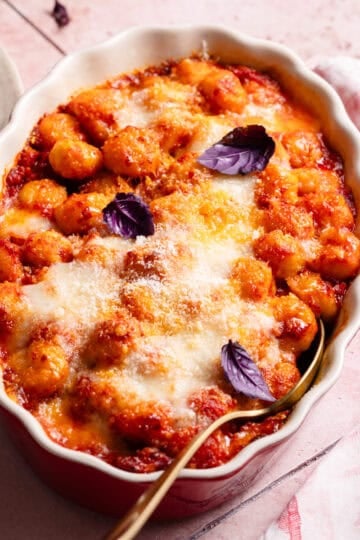
If you love gnocchi, try my easy gnocchi al forno. A delicious potato gnocchi with a rich tomato sauce, melted mozzarella, and Parmigiano Reggiano. All baked until bubbling and gooey
Back in Italy, we can find a long list of different types of pasta within each region. They are mainly divided into two categories: pasta made from semola dough (sometimes other flours are used), and pasta made from egg dough. Egg pasta has a richer taste and it requires a bit more work to obtain a thin pasta. While gnocchetti is lighter and you will just need to roll the gnochetti using the thumb.
Gnocchetti Sardi or gnocchi is a rigid pasta shape that recalls the feature of a little shell. It has peasant origins from Sardinia and it is also known as Malloreddus. This gnocchi Sardi is usually prepared during a family feast or for any special occasion, and they are served with a sauce called malloreddus alla campidanese. A slow-cooked meat sauce made from Sardinia sausage, tomatoes, and saffron. Most traditional recipes add saffron to the cooking water pasta to give an extra yellow color to the gnochetti.
Gnochetti Sardi is completely different from the classic well know gnocchi. Which are basically made from eggs, potatoes, and a little flour, resulting in a little gummier, and heavier than the gnocchi Sardi.
Jump to:
🍝 Why you will love
- Easy to make- The process of making gnocchi Sardi is super easy. Do you remember making playdough when you were kids? The process is that simple. Mix, knead, and shape. In fact, it'll make a great activity to make with your kids.
- Low ingredients- You'll need just 2 ingredients: semola flour and water.
- Eggless pasta- Good news! The gnochetti is eggless which means is perfect for those who have an egg allergy. Furthermore, it is the perfect pasta for vegans as no eggs are involved in the process of making it.
- Budget-friendly- The list of ingredients is not only short but it is affordable too. So another point in favor.
🥘 Ingredients
The list includes just 2 ingredients, or maybe just 1 if your tap water is safe to drink. Here is what you need. See the recipe card for quantities.
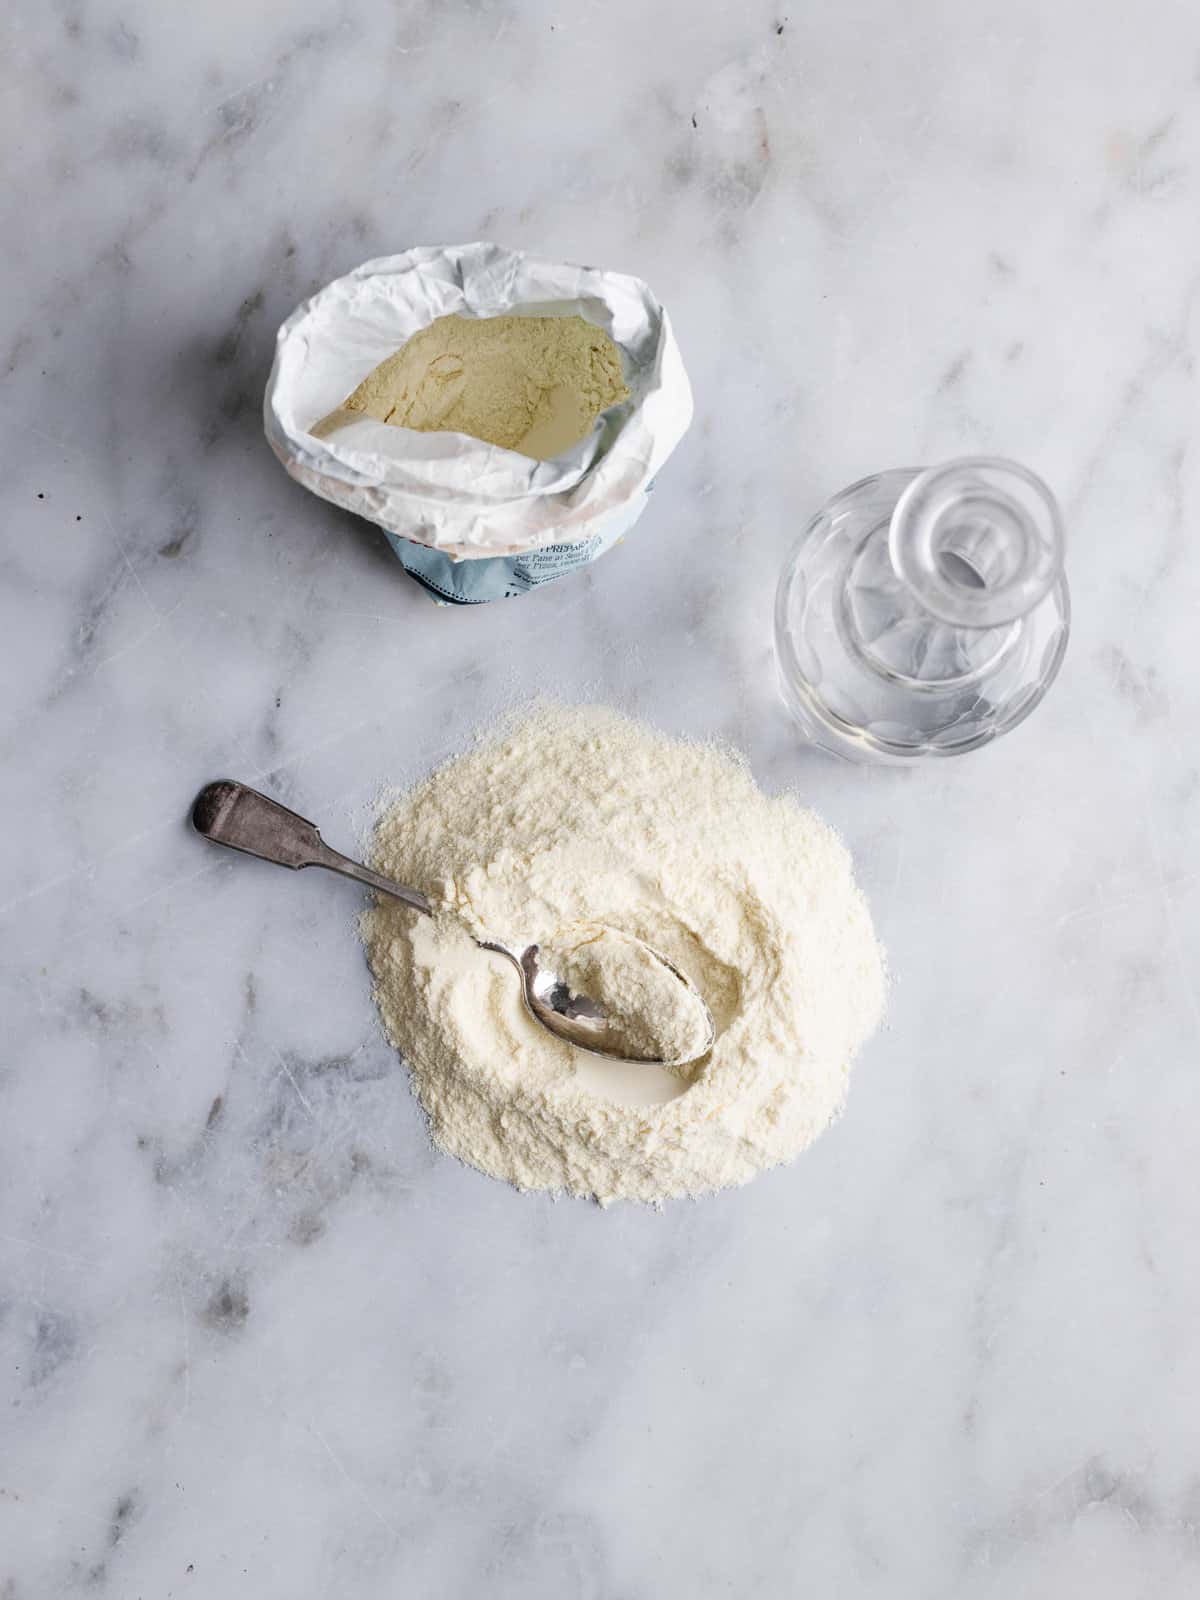
- Flour- Semola rimacinata is what you need for making the gnochetti, and gives the gnocchi Sardi the classic "al dente" texture. Make sure that the label on the package says "Semola rimacinata di grano duro". Nowadays it can be easily found even in the supermarket, otherwise, look in any Italian deli or online.
- Water- Water is the second ingredient on the list and it acts as glue once combined with the water. I recommend using still water at room temperature and a kitchen scale to measure as it is more accurate than the cup.
Semolina or semola flour?
Most people think that the 2 of them are the same things, however, they have differences. Both of them are made from durum wheat but the difference is in the texture.
Semolina flour- It has a coarse texture, similar to polenta flour or corn flour.
Semola flour- It has a fine texture similar to the "traditional" white flour. Here the durum wheat is re-milled, hence the name rimacinata, to give an extra fine texture. In Italian is called "Semola rimacinata di grano duro", and this is what you need to make gnocchetti. Also, it works great for making focaccia and bread.
🔪 Instructions
Homemade pasta can be such a fulfilling activity and it shouldn't be stressful at all. With my step-by-step guide, you'll see how easy and fun is to make gnocchetti Sardi. Also, in this recipe, you can find different techniques to achieve the same result.
Note: this is just a quick introduction. Please read the recipe card for the full instructions.
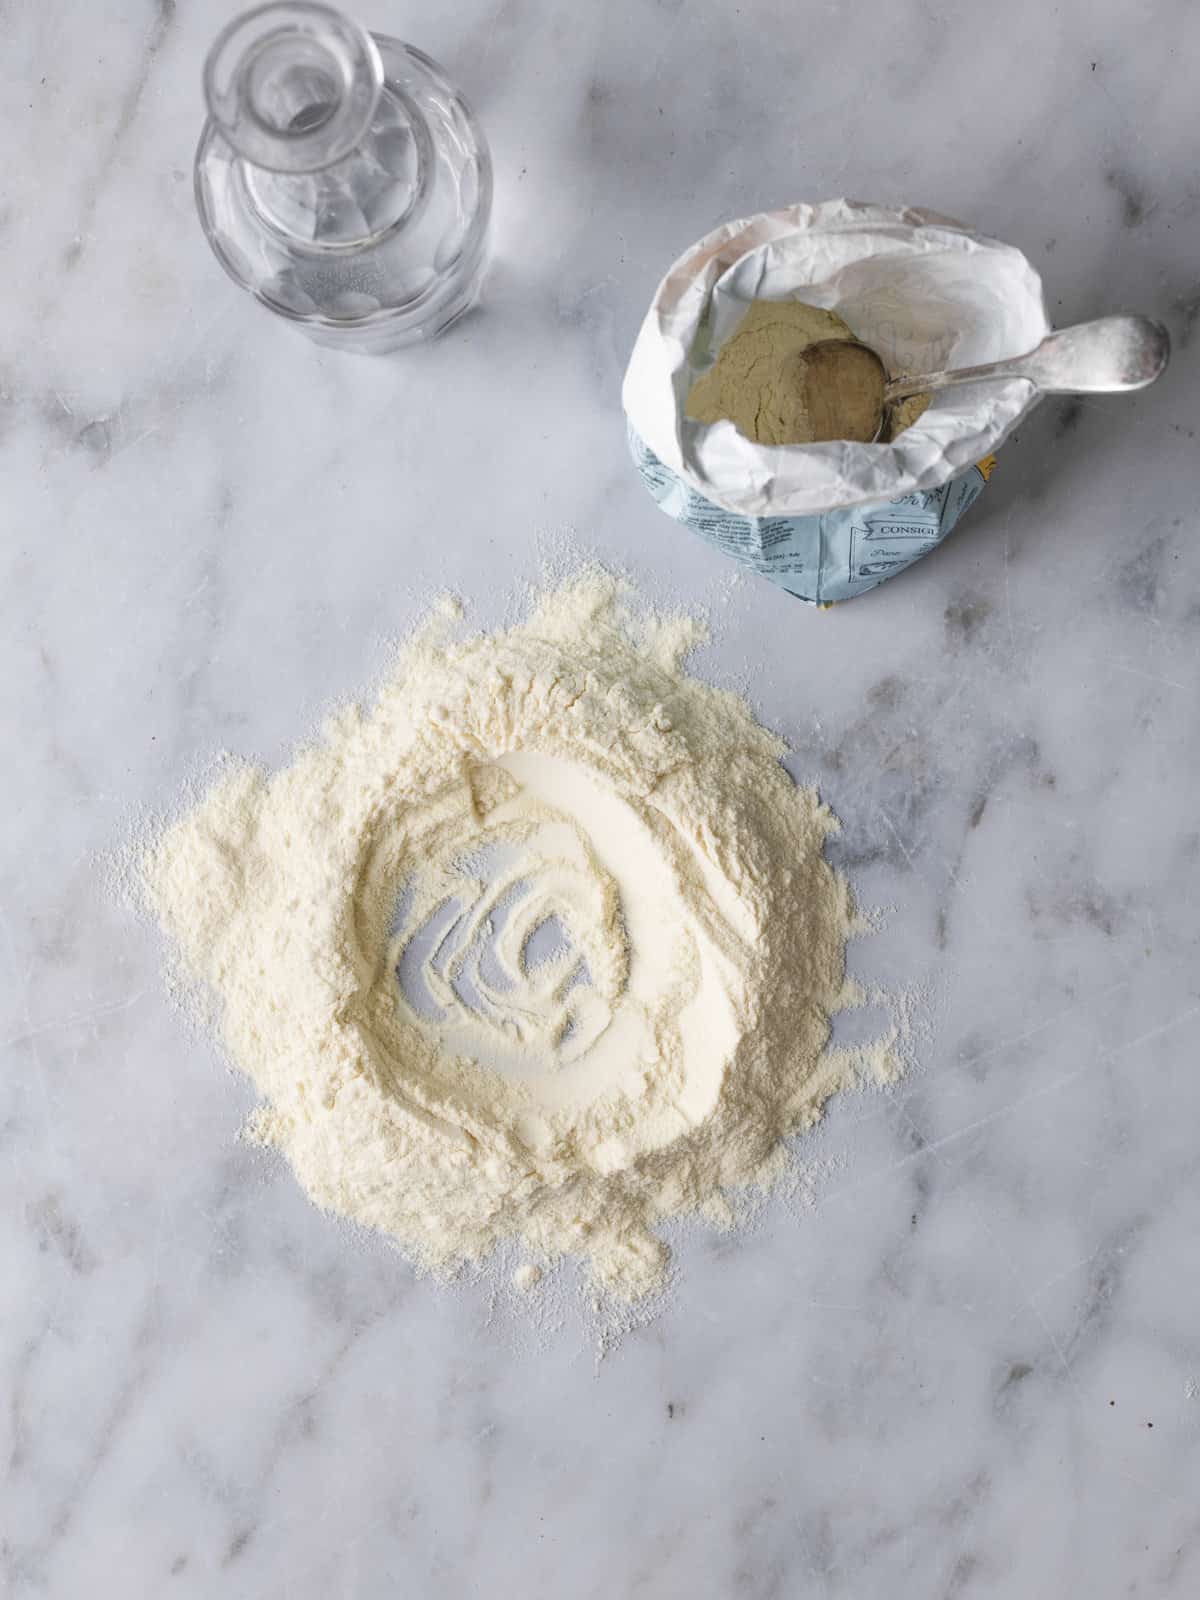
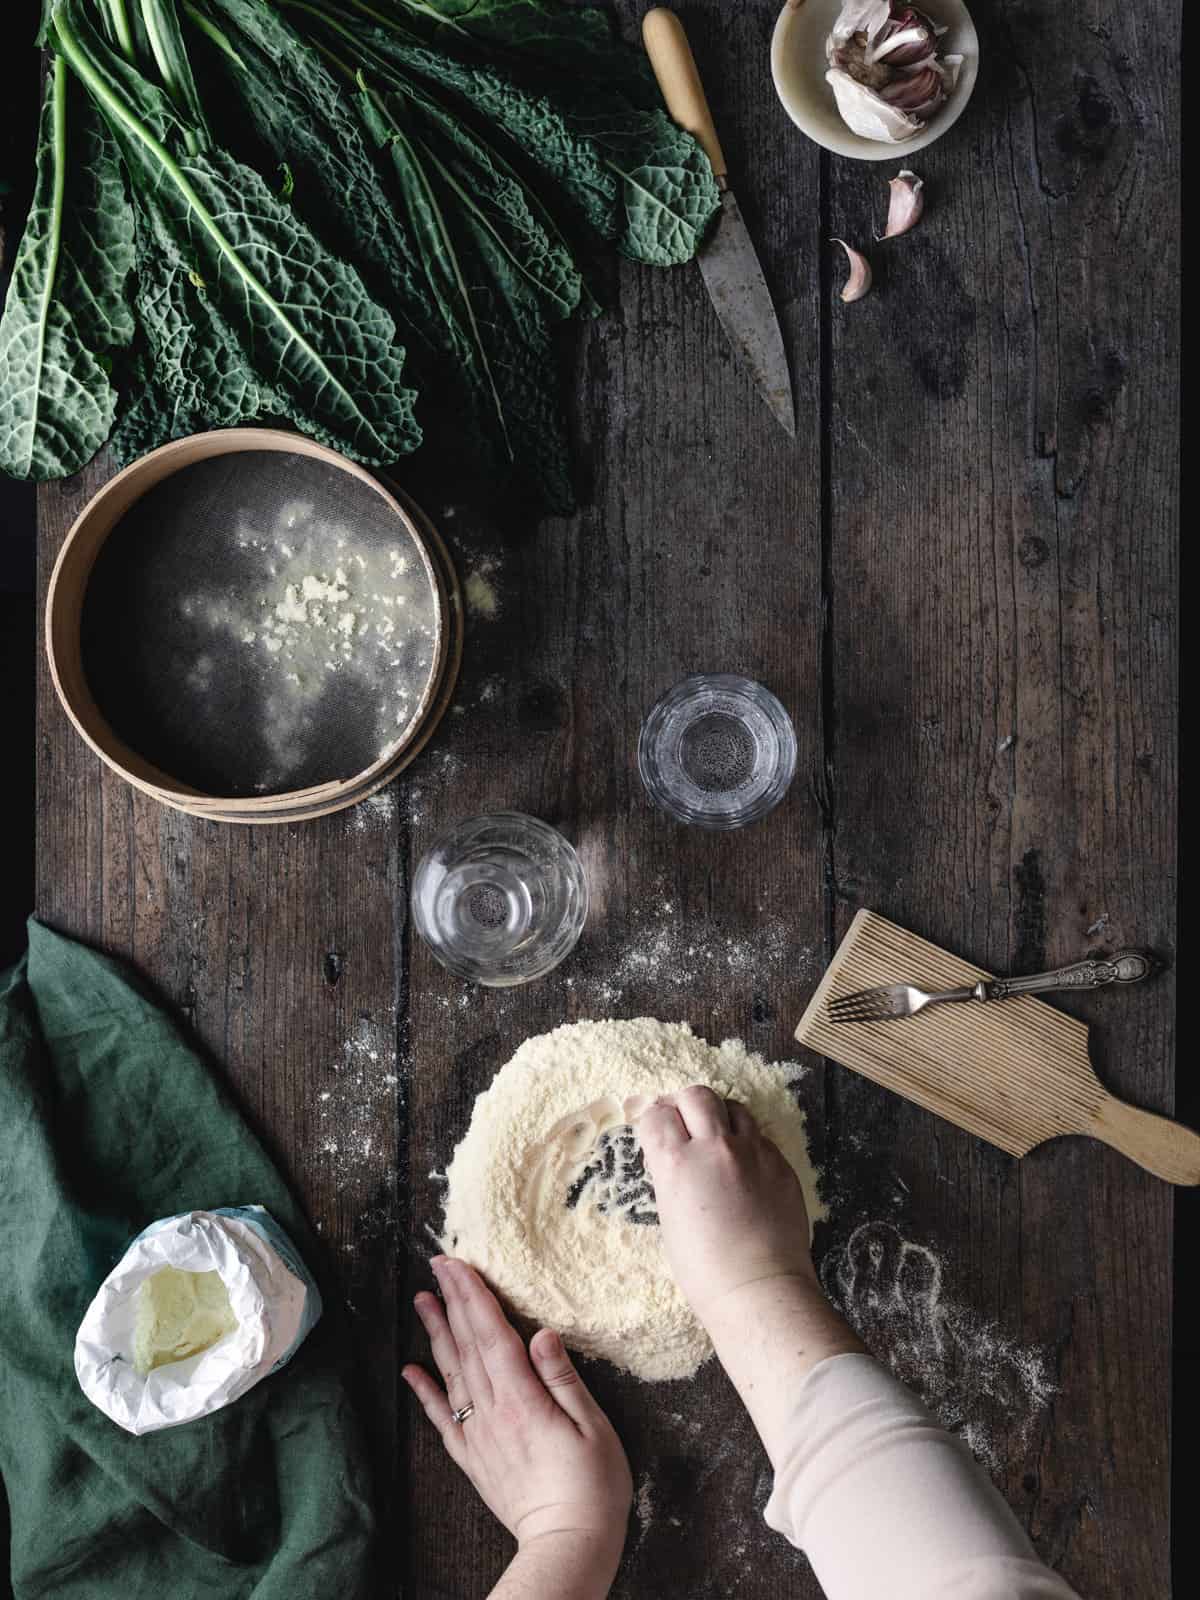
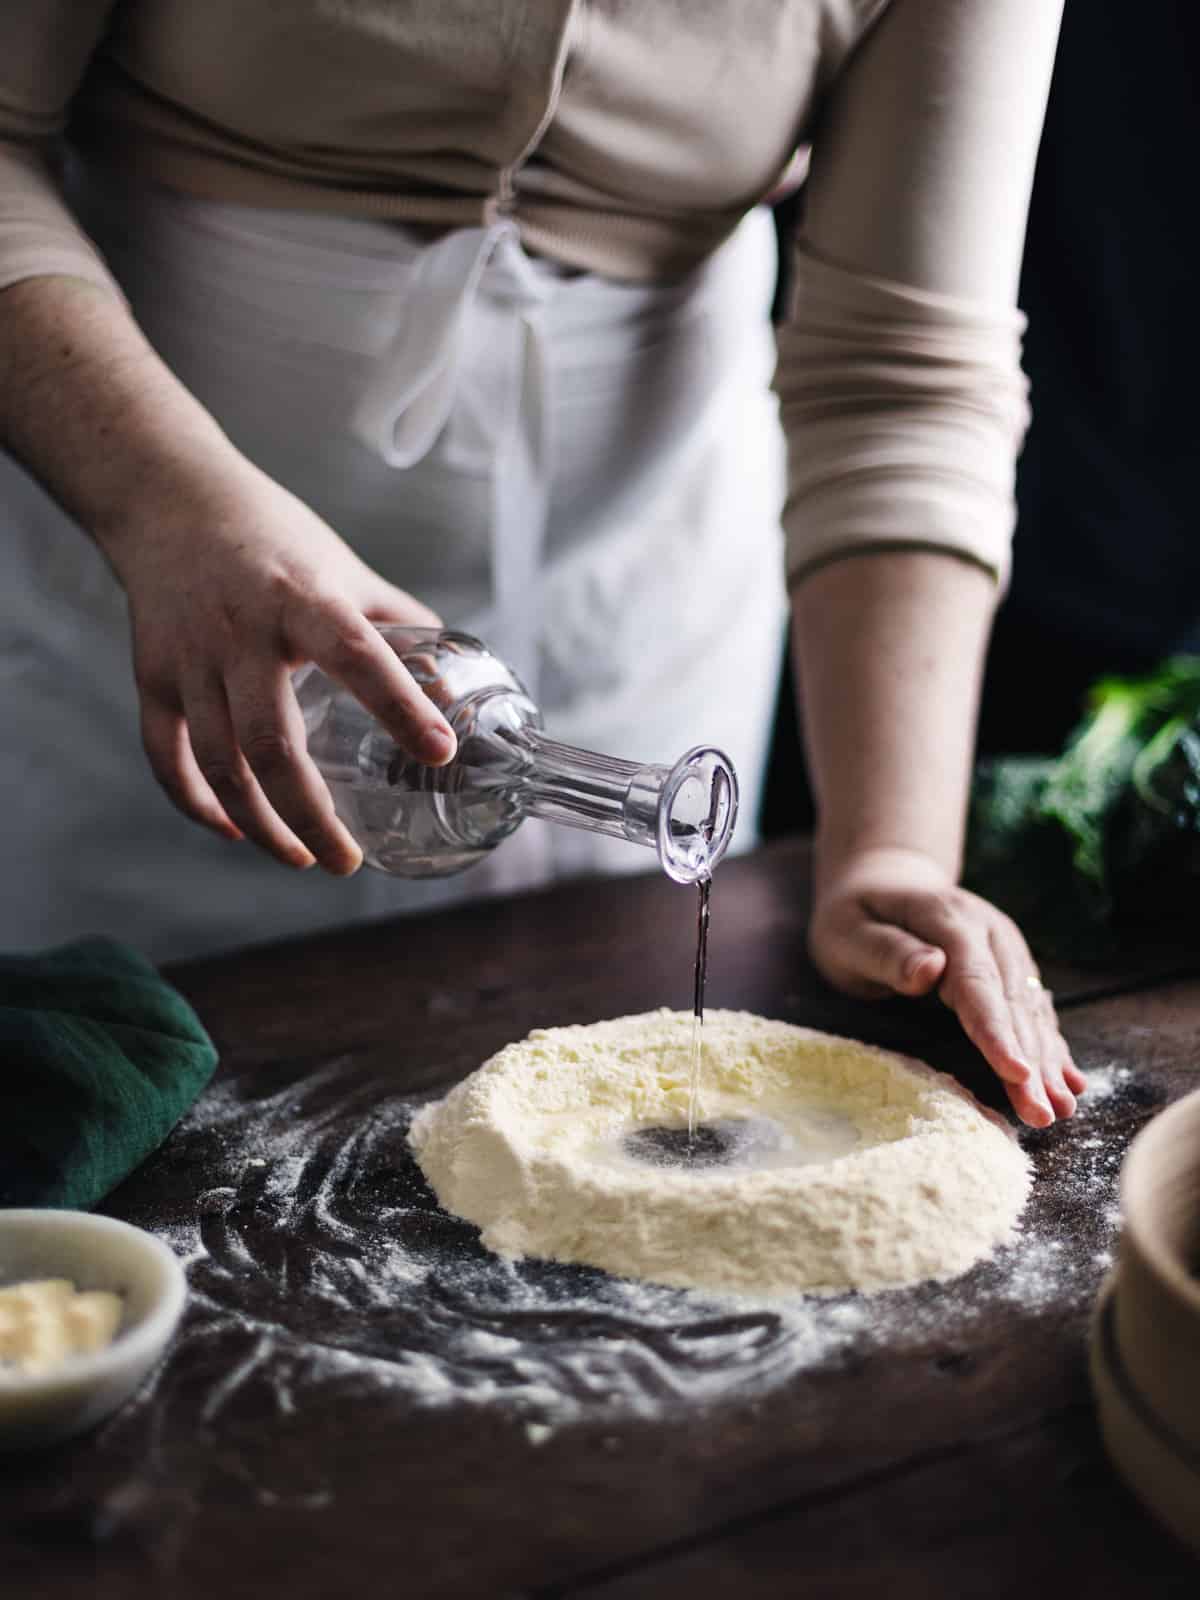
Mix by using a wooden board- Spill the flour on the work surface and make a well in the center. Pour the water and with a fork or hand, slowly mix. Then knead until a rough ball is formed.
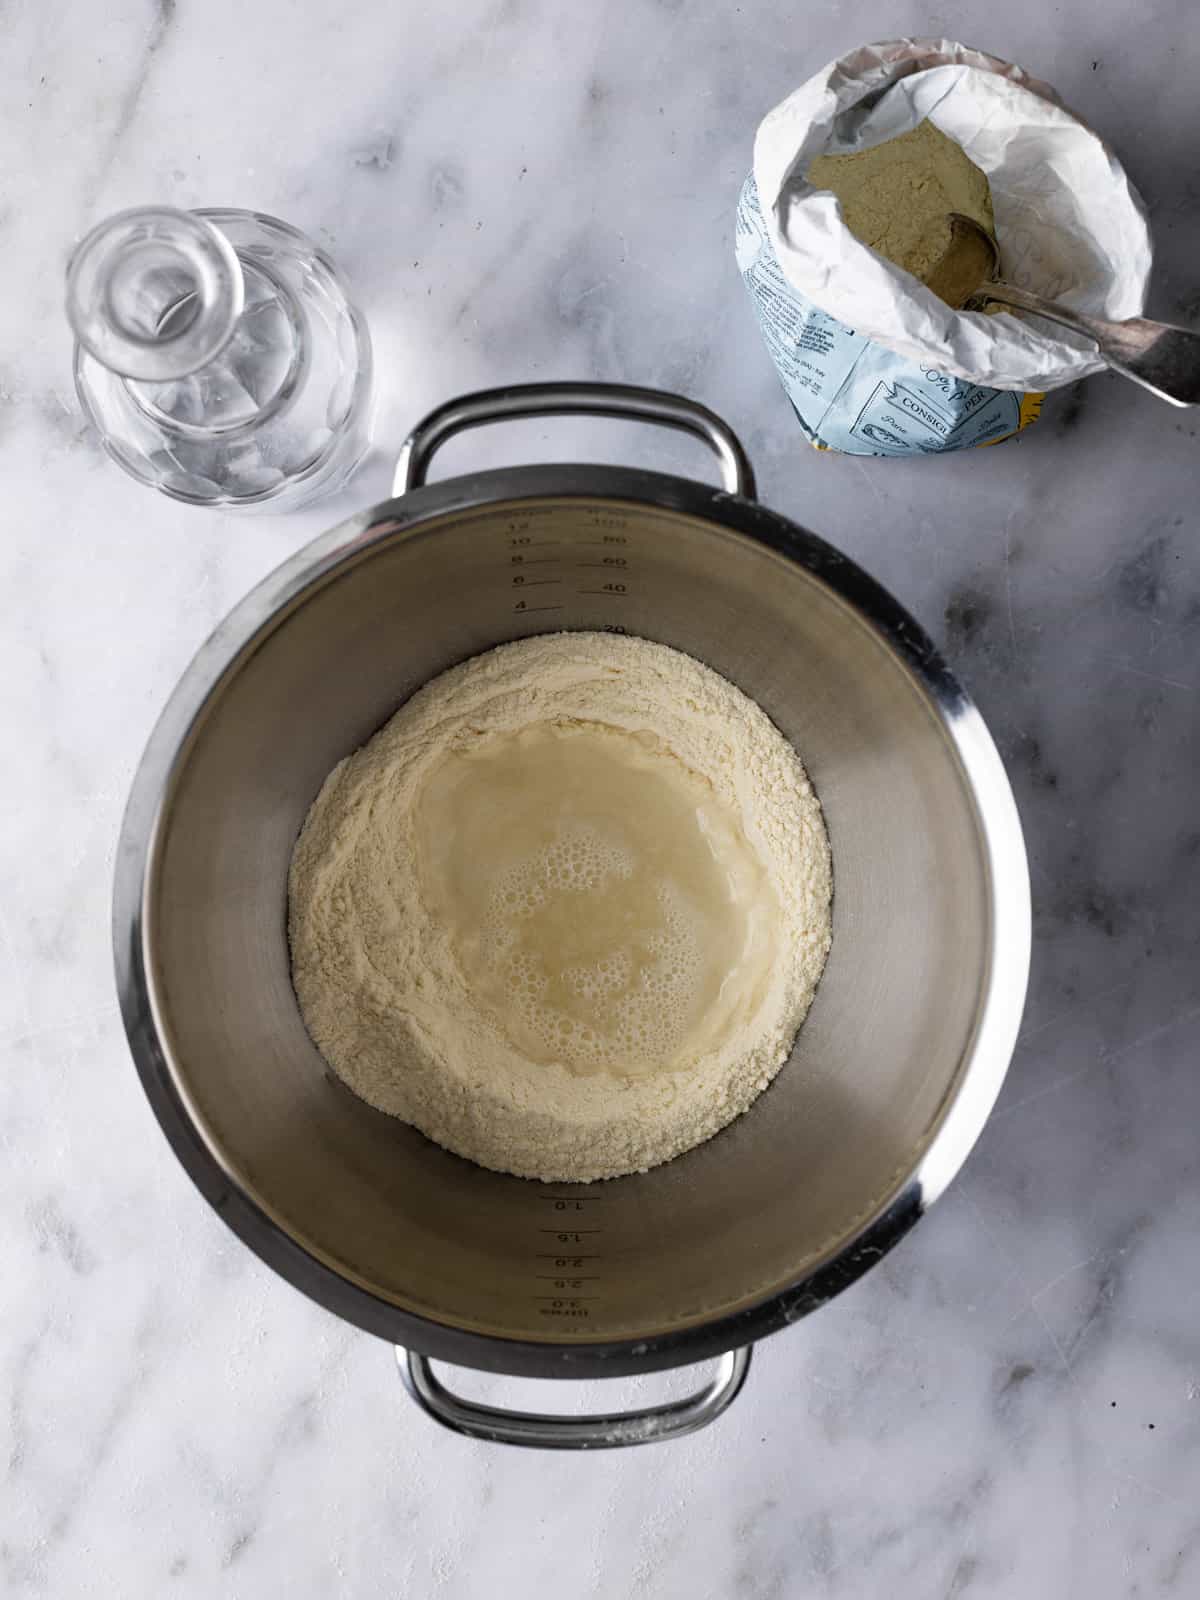
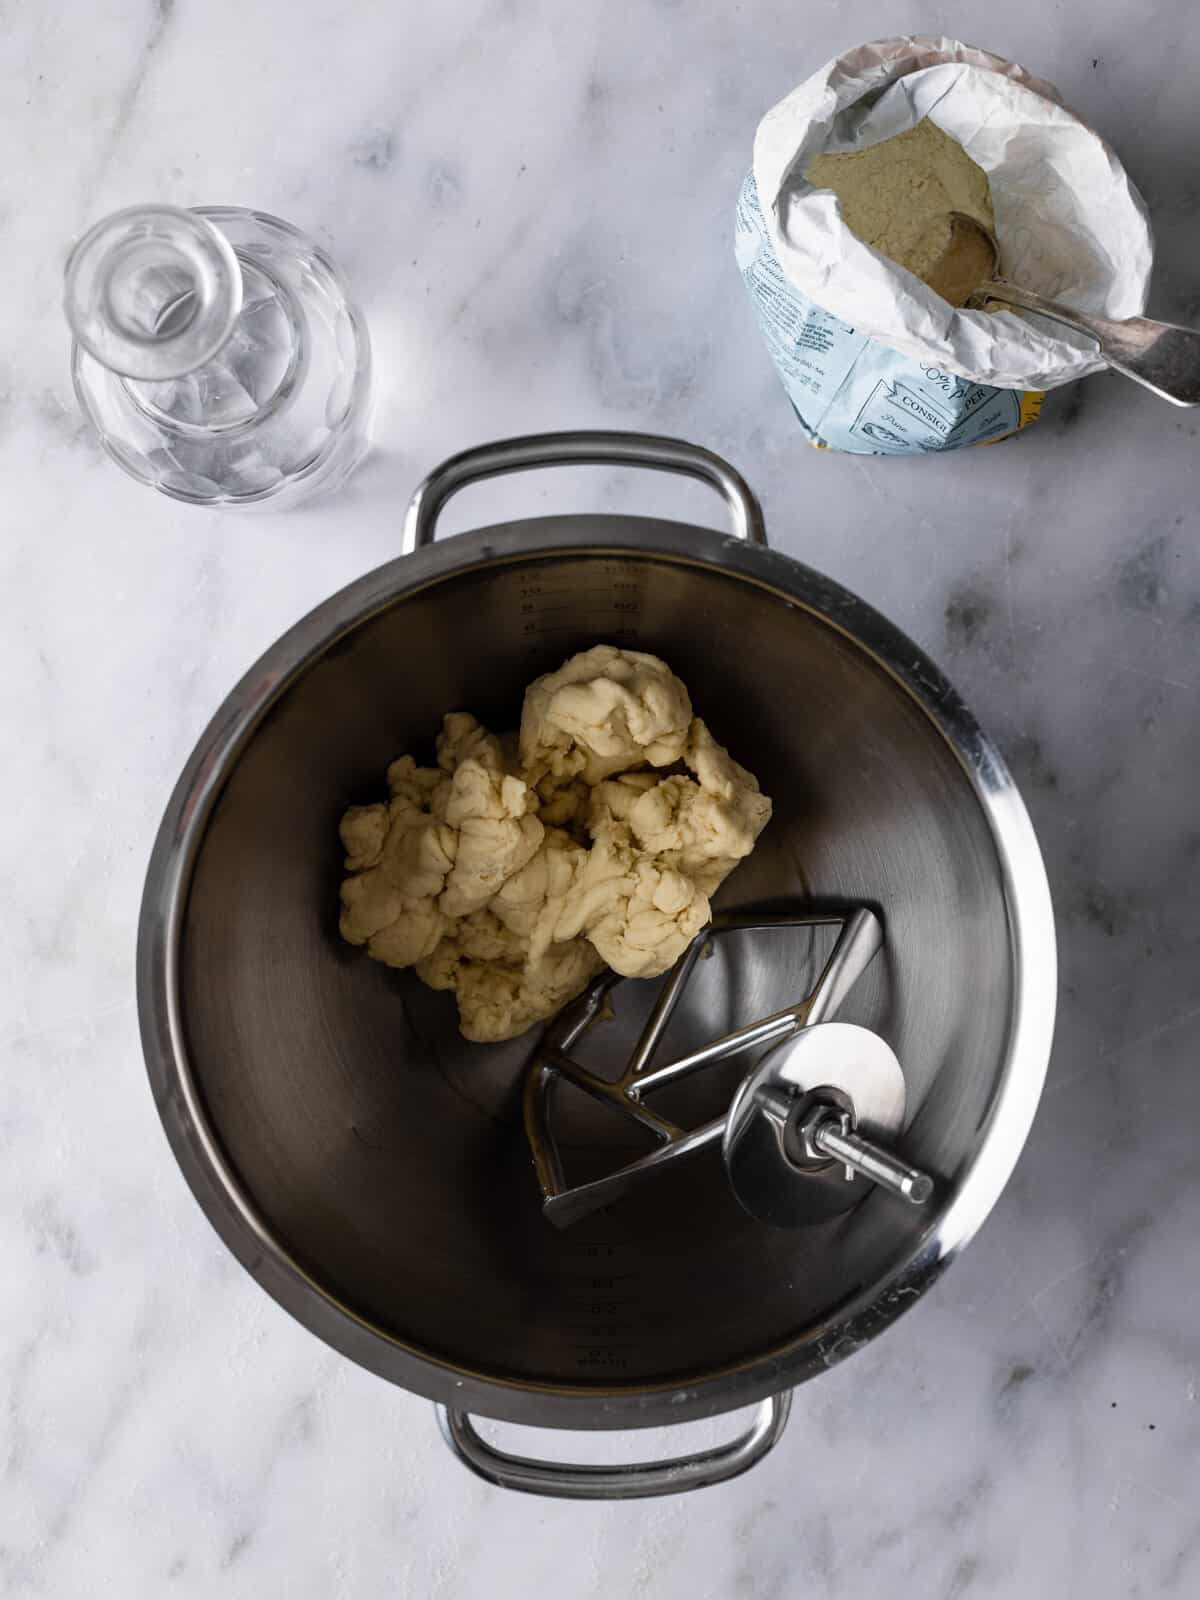
Mix by using a large bowl- Tip the flour into the bowl, make a well in the center, and pour the water. With a fork or hand, slowly mix and then knead with your hand until a rough ball is formed. Make sure to scrap any bits left on the side and the bottom of the bowl and knead it back in the dough.
Mix by using a stand mixer- Add the semola and water into the bowl and start the machine at medium speed. Work with the paddle for a few minutes until you have a rough ball.
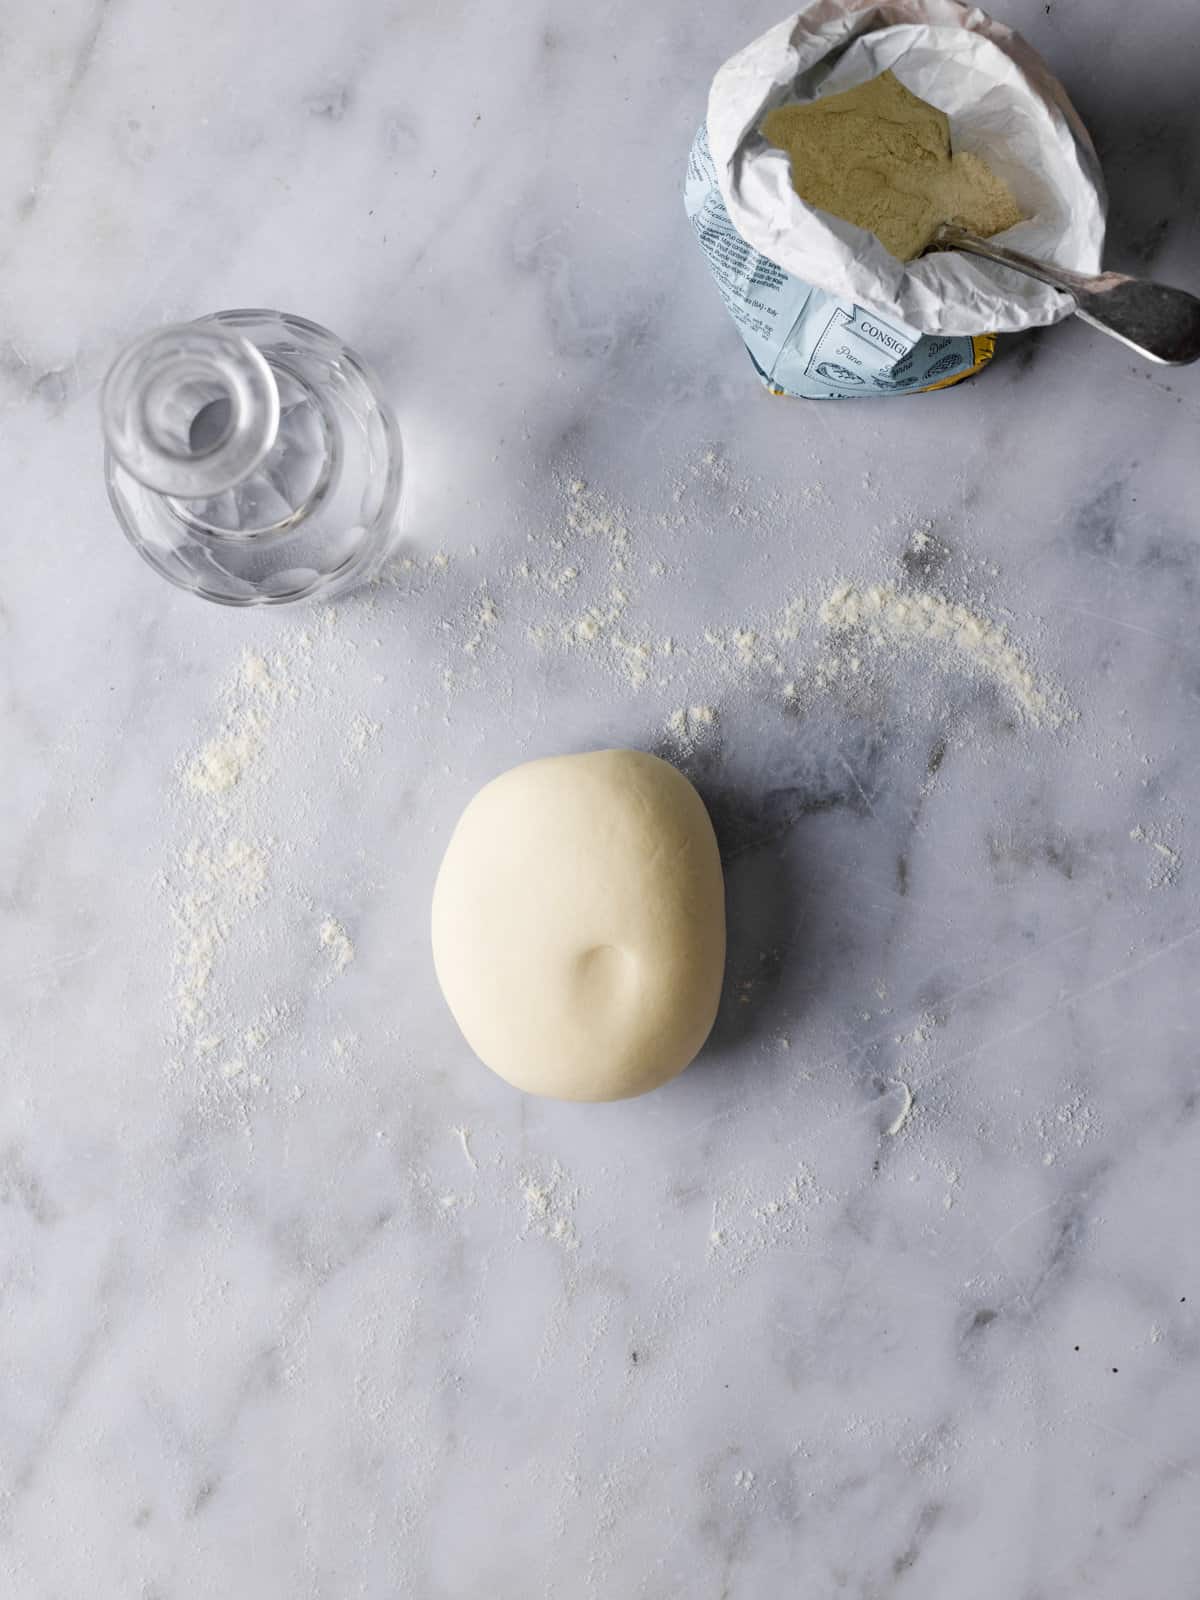
Knead- Knead the ball on a clean surface and work it for 10 minutes until is smooth. Cover* the gnocchetti dough and let it rest for 30 minutes.
*Tips: you can either use a kitchen towel, an upside bowl, or some plastic wrap (cling film).
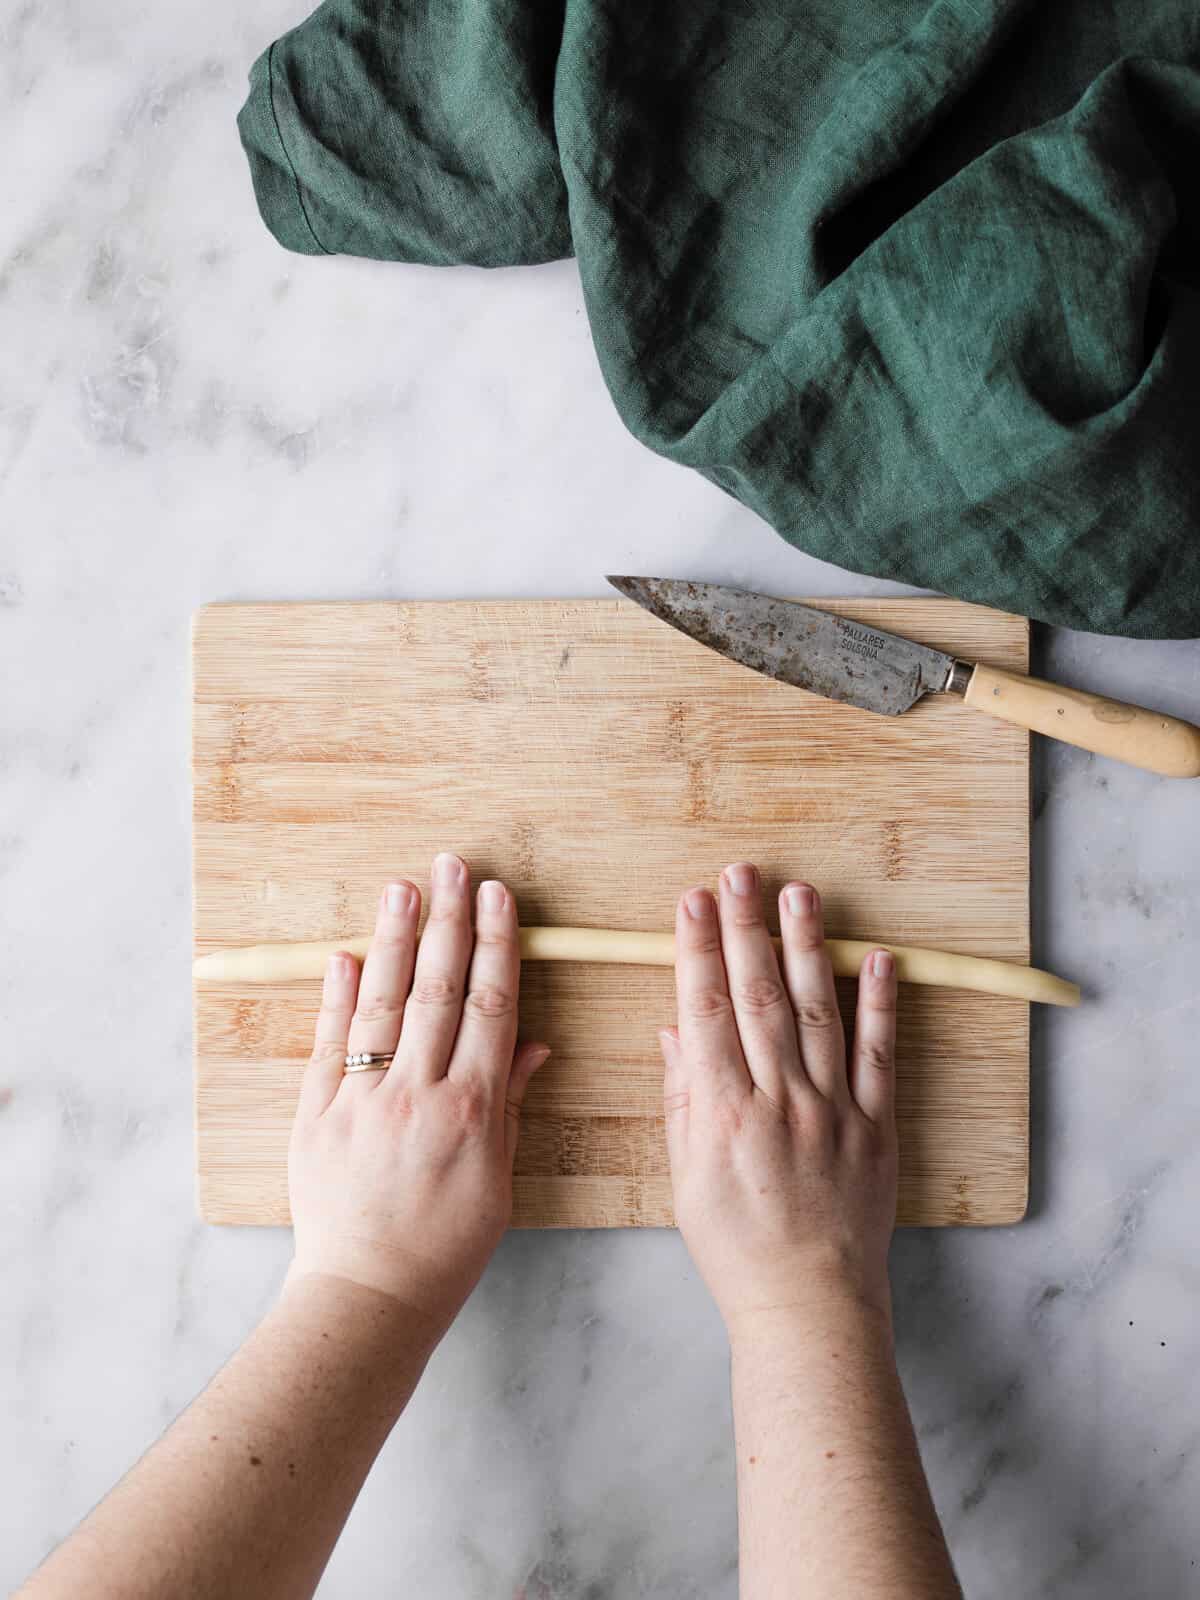
Shape- Cut one section from the dough and cover the rest. Roll the section into a long thick rope.
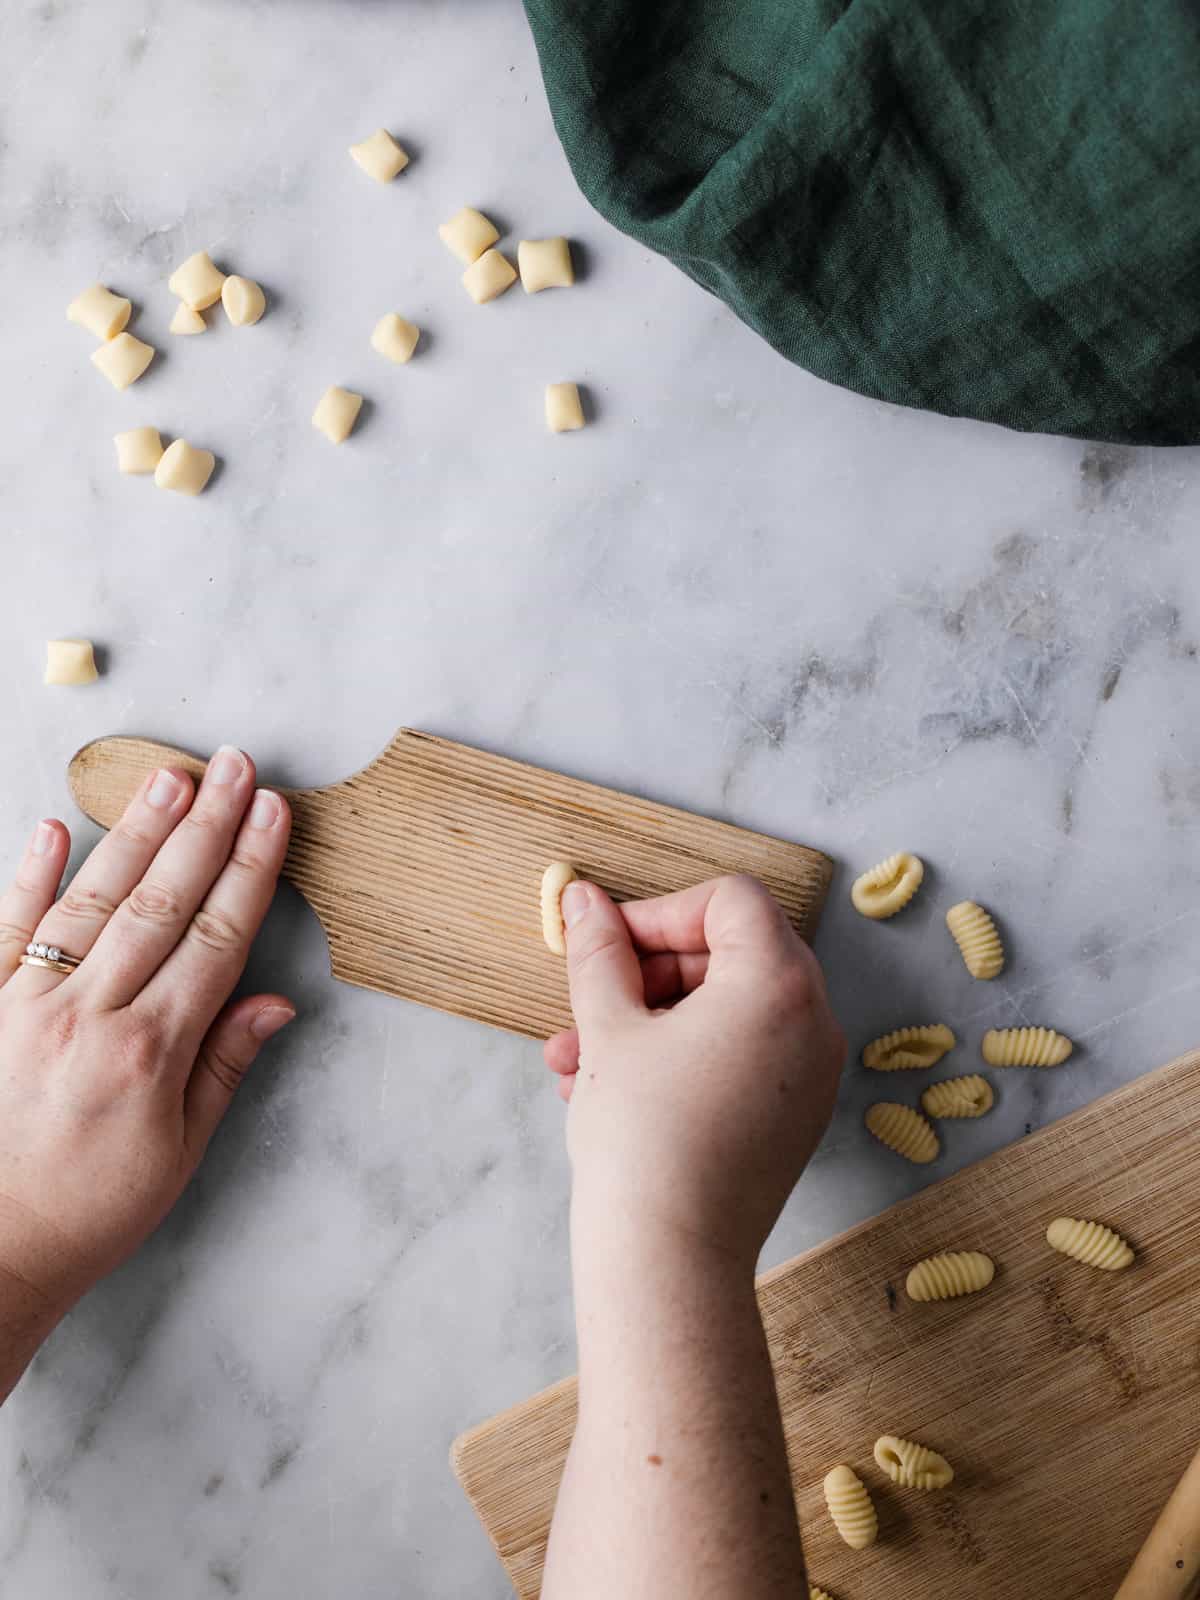
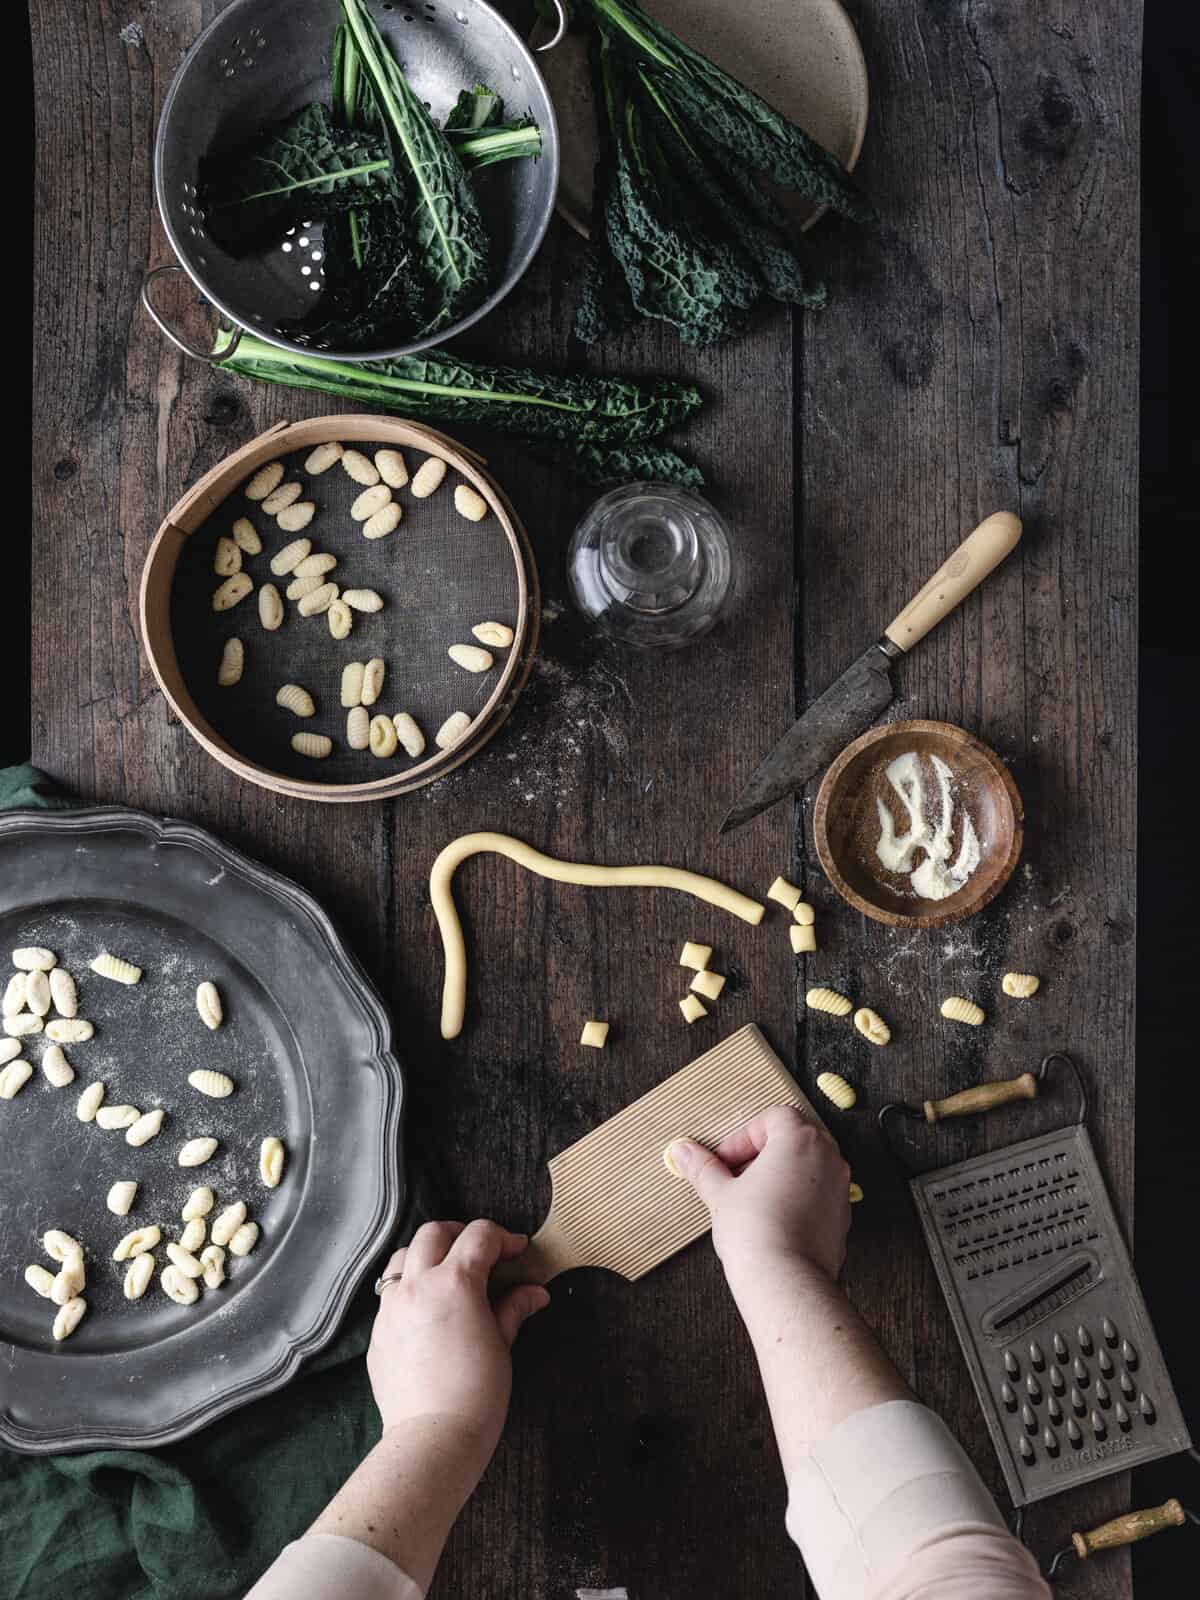
Cut- Cut the rope into small gnocchi with a knife. Take one gnocchetti Sardi and roll the piece through the gnocchi board. Continue with the rest. Cook the gnochetti for 4 minutes in plenty of salted boiling water.
📖 Suggestion
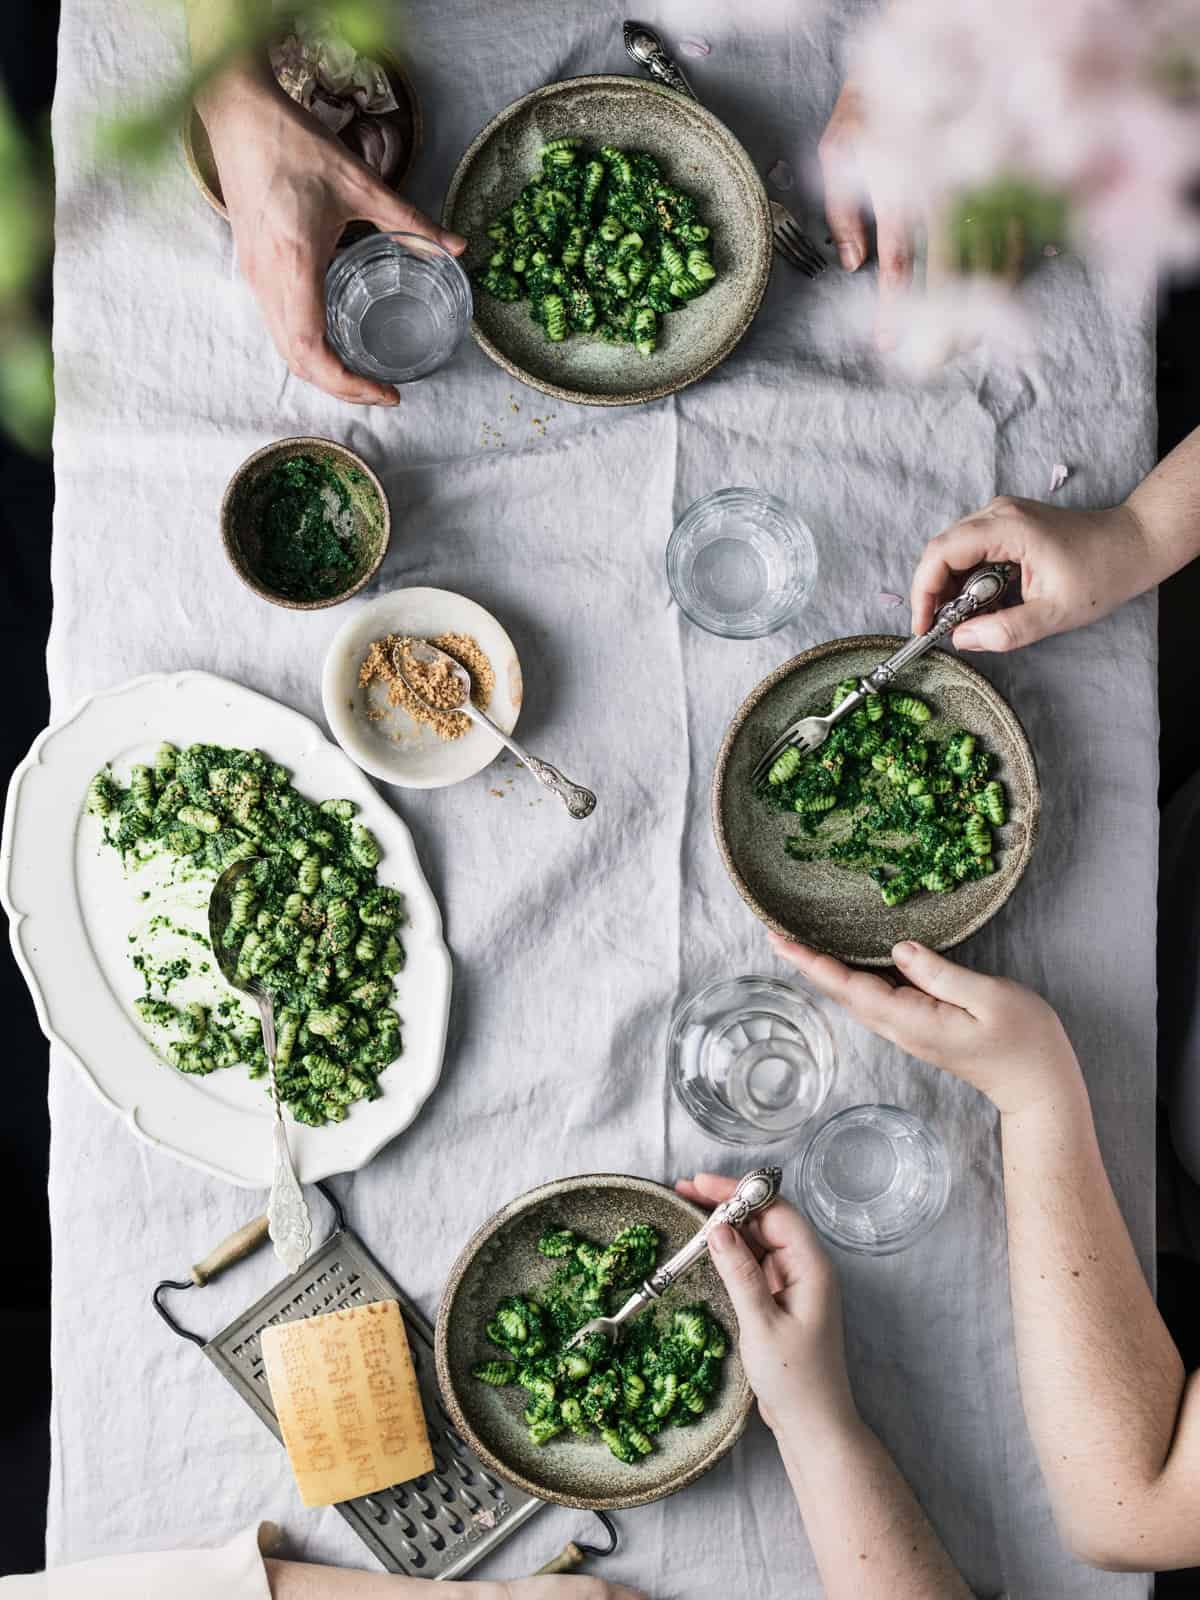
Here are my favortite pasta sauces to serve my gnocchetti or gnocchi Sardi.
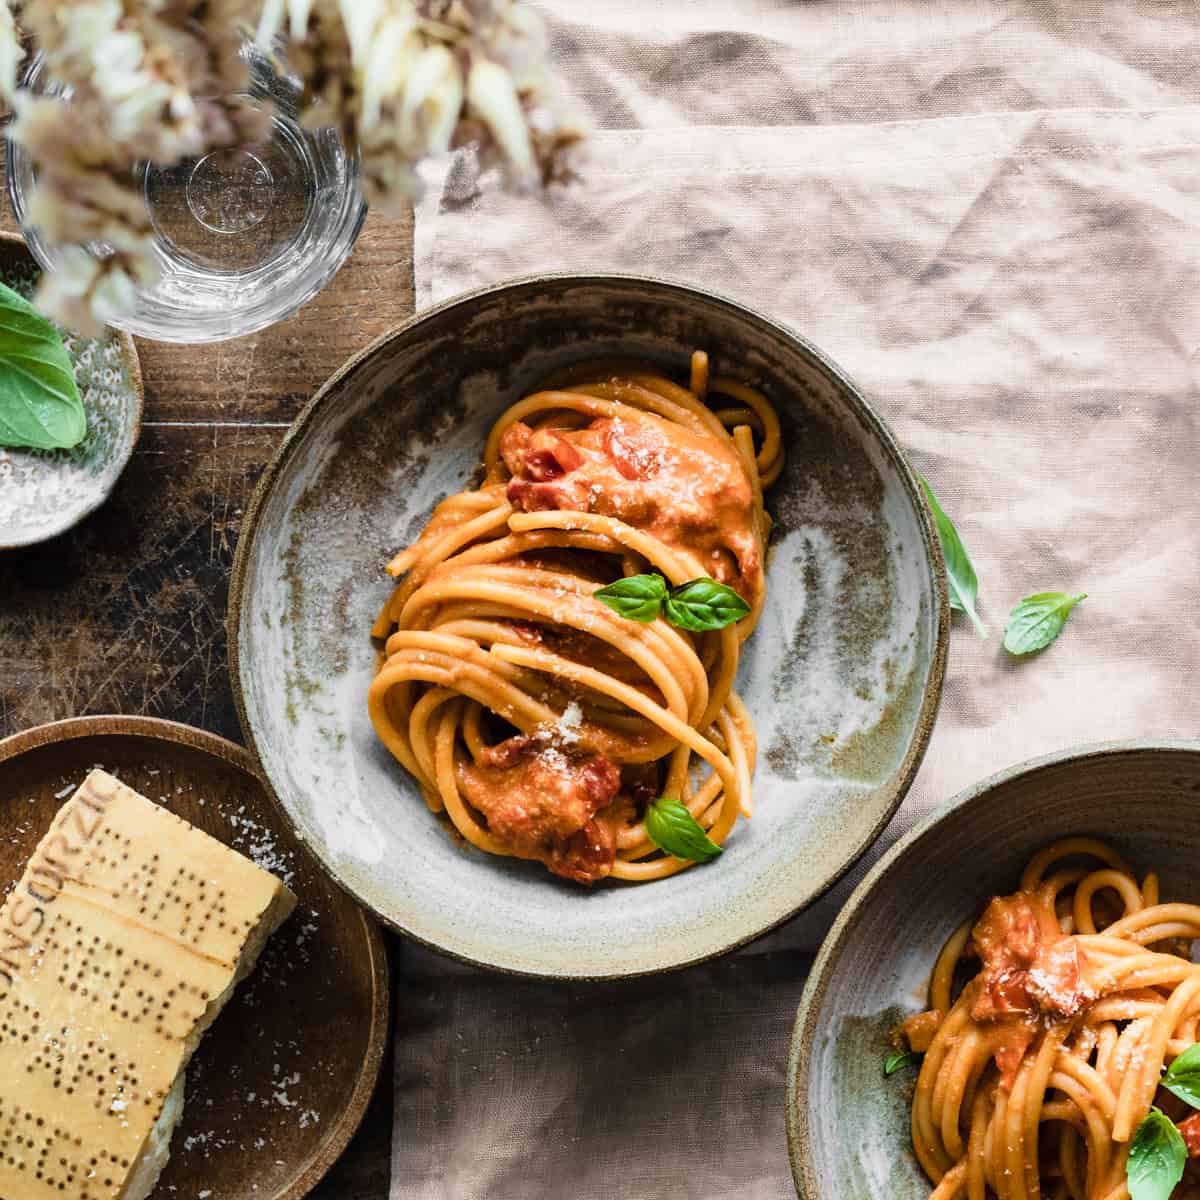
A great match would be with my delicious tomato and burrata sauce recipe. A creamy and delicate tomato base with melted burrata cheese. So luscious.
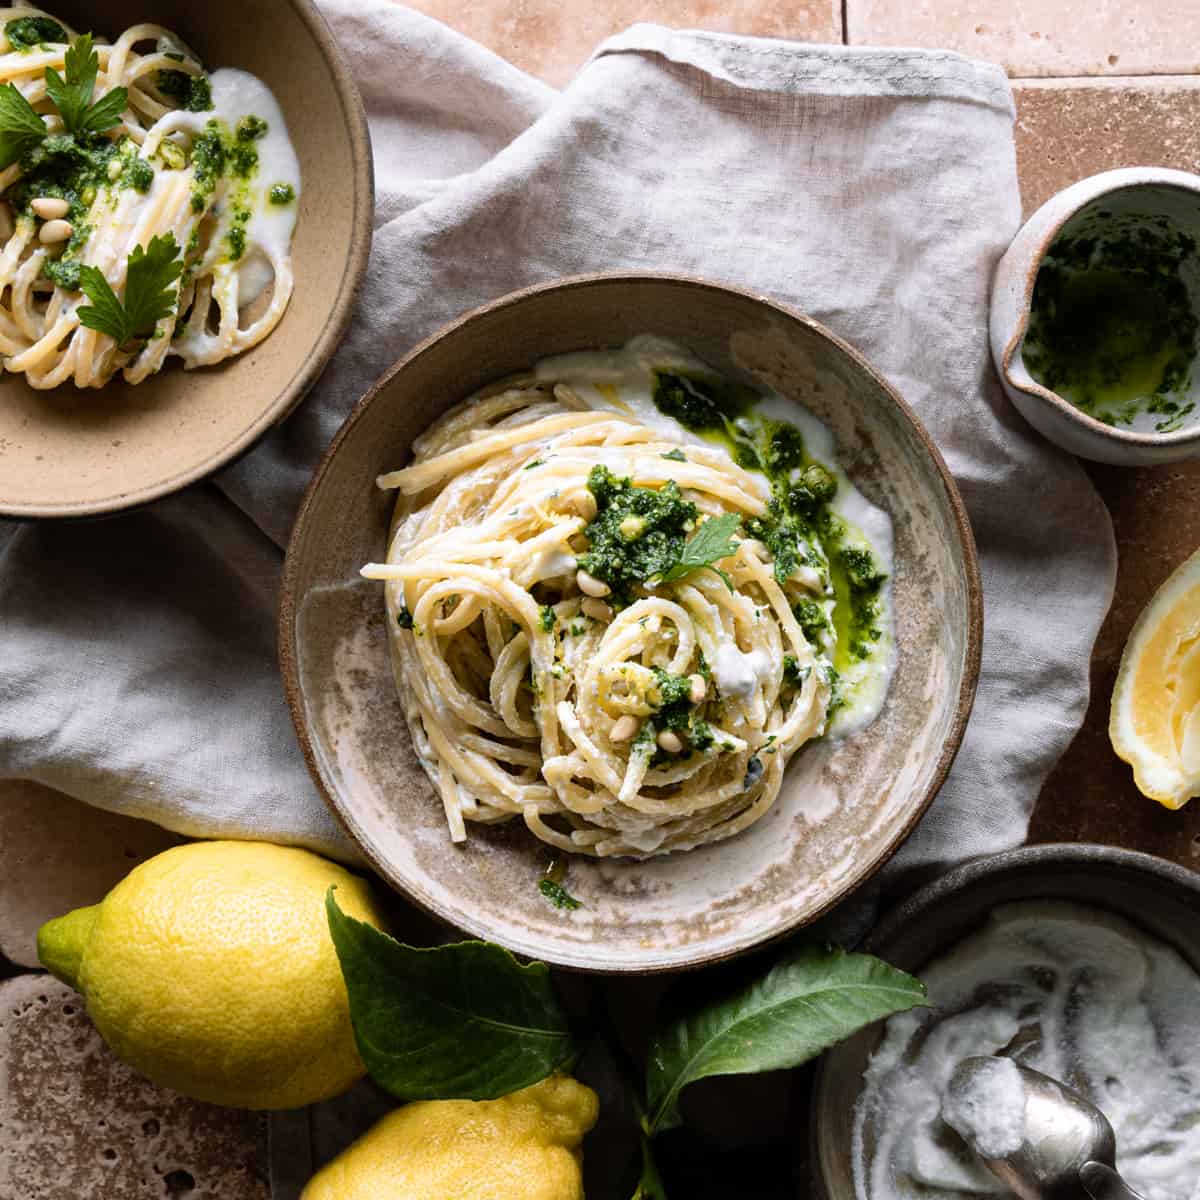
If you are looking to skip the tomatoes try my ricotta sauce. A tangy but still delicate sauce made with ricotta, a handful of Parmigiano Reggiano cheese, and the zest of a lemon. Another idea would be to use my pesto with broad beans and almonds, it is easy and mouthwatering.
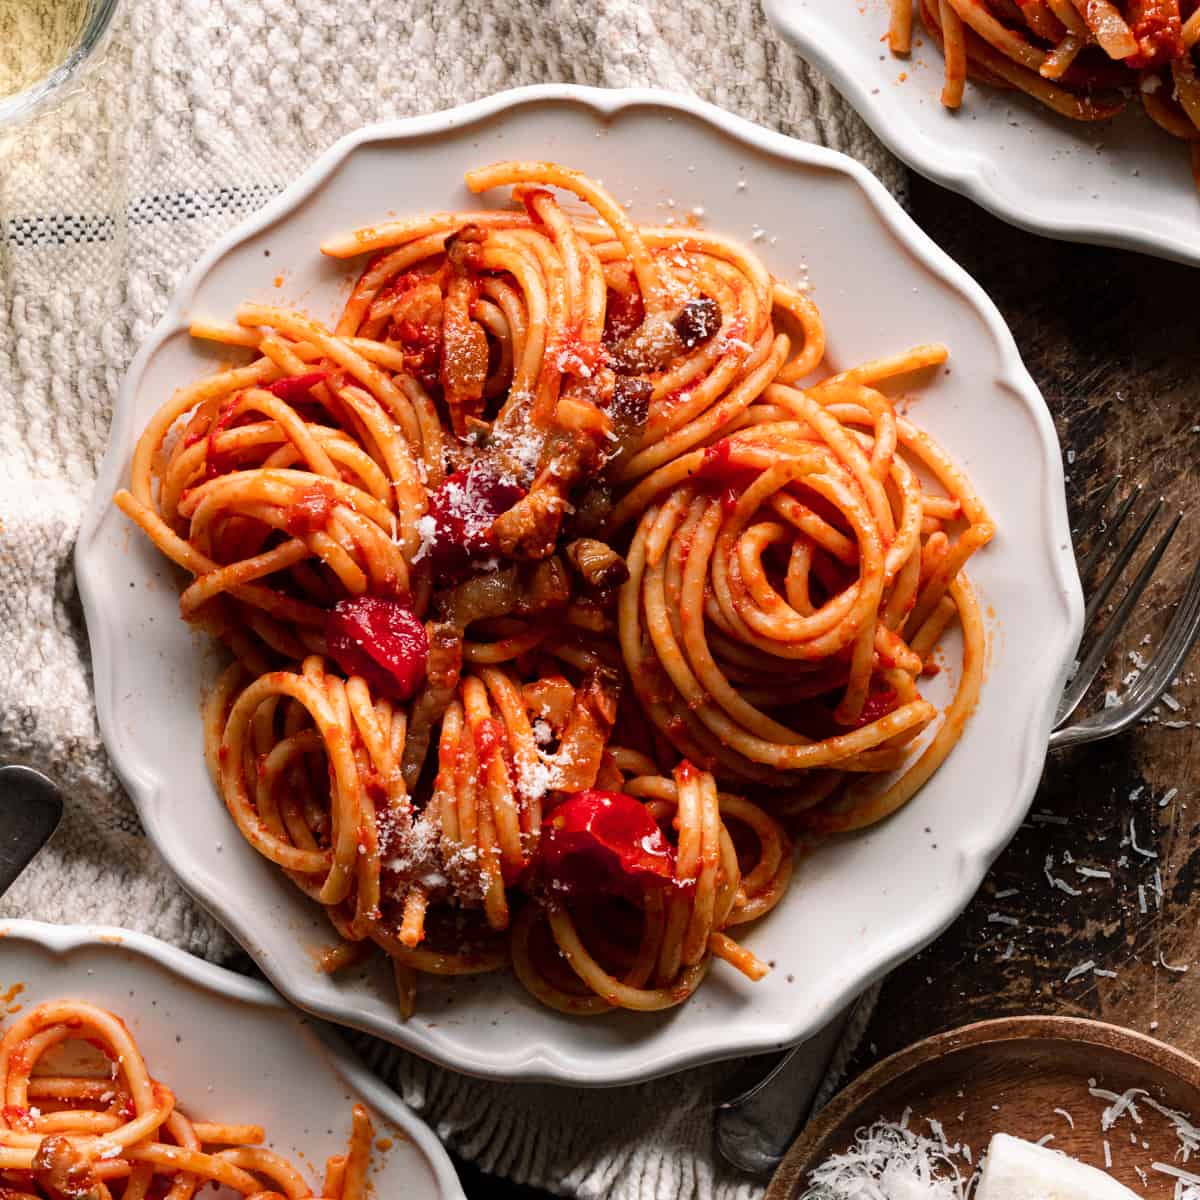
Furthermore, try the gnocchetti with my authentic amatriciana sauce recipe with tomatoes and guanciale. It is simply delicious.
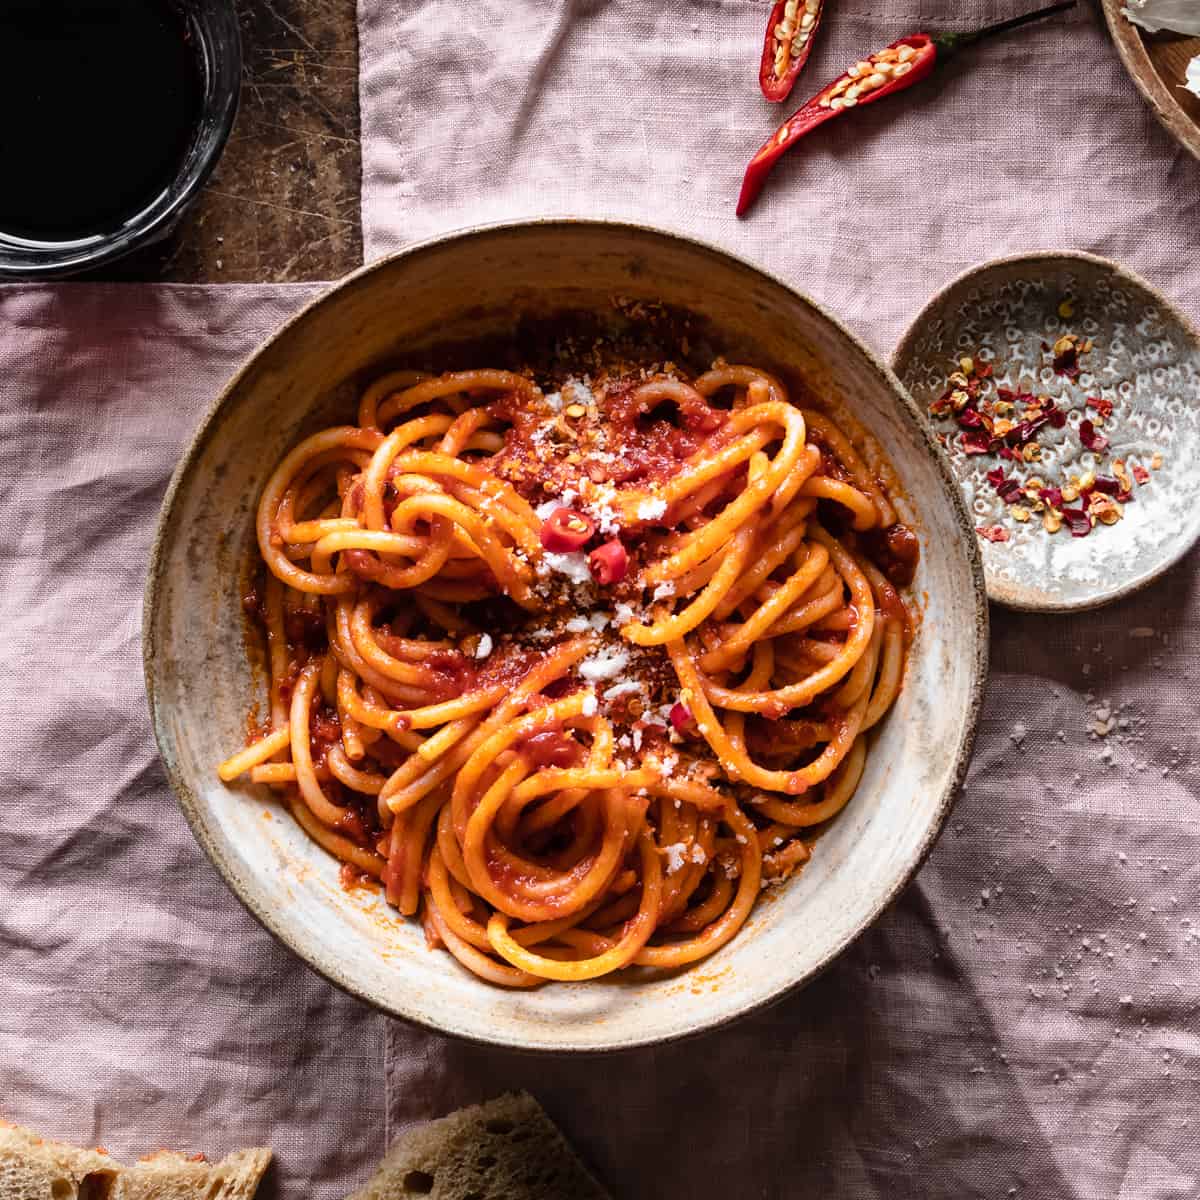
Use a classic rich Italian sauce made from slow-cooking chili, garlic, olive oil, and tomatoes to season my gnochetti. As my arrabbiata sauce, its hot flavor matches perfectly with it.
Also, why not make a tomato base sauce and bring the gnocchi Sardi to the next level? Simple by baking it in the oven. How? Transfer the cooked gnocchetti along with the sauce to a casserole. Then add a knob of butter, a handful of Parmigiano Reggiano cheese, a few slices of mozzarella, and a few basil leaves, and mix. Preheat the oven to 392°f or 200°c and bake it for 30 minutes or until the mozzarella starts to melt and the top is broiled.
🥗 Pairing
If you are looking for another meal to go with gnochetti sardi try my favorite Italian meatballs cooked in a creamy and delicious tomato sauce. Also, you will love my family's recipe for a classic Roman dish, chicken with pepper in tomato sauce. Tip: use the same sauce to season the gnocchetti sardi. Yum!
Another idea would be to pair it with this easy and quick chicken piccata. Make sure to have a ton of bread to dig into the sauce.
🍽 Equipment
Work the semola and water on a clean wooden board. But if you want to work without making a mess use a large mixing bowl to mix the gnocchetti, this way the flour will not go anywhere. Also, a stand mixer will work great too.
Use a gnocchi board to make that beautiful shell pasta typical of the gnocchetti Sardi. Another option is to use a fork or grater. In case you don't have any of the previous equipment to shape them, just cut them into small gnochetti. They will be great too.
To dive the dough and cut the gnochetti use a sharp non-serrated knife. The result of the cut will be smooth and precise. Another way would be to use a steel rigid bench scraper.
Last but not least, use a scale to measure the ingredients. A scale makes a recipe more accurate than a cup's measurement.
Storage
Fridge- Store them in the fridges for up to 3 days, and dust them with semola in an even layer. Alternatively, store the gnocchetti dough covered with cling film or plastic wrap in the fridge for up to 3 days.
Freezer- A great way to store the gnocchi Sardi is to freeze them. I love how this method can be so handy especially when you have unexpected guests and no time to make a whole meal. Dust the gnocchetti with semola and lay them on a large tray far away from each other and freeze them. Once frozen roughly after 1 hour, transfer them into a freezer bag. Cook them when still frozen in boiling salted water, they will take a little bit longer to cook.
💭 Top tip
Make sure to follow these tips to prepare the best gnocchi Sardi.
- Dough- The dough shouldn't feel too soft. It is important to work the dough for 10 minutes on a wooden surface to build the gluten.
- Let the dough rest- The dough needs to rest for 30 minutes, this way it will relax and will be easier to shape.
- Cover the semola dough- This step is crucial. Always cover the dough during the resting time and the shaping, to prevent it from drying out. Use a large bowl upside down on the work surface, a kitchen towel, or plastic wrap (cling film).
- Don't dust the dough- Make sure to don't dust the dough when you are either making the rope or shaping the gnochetti with the semola. This way they will glide better on the gnochetti board.
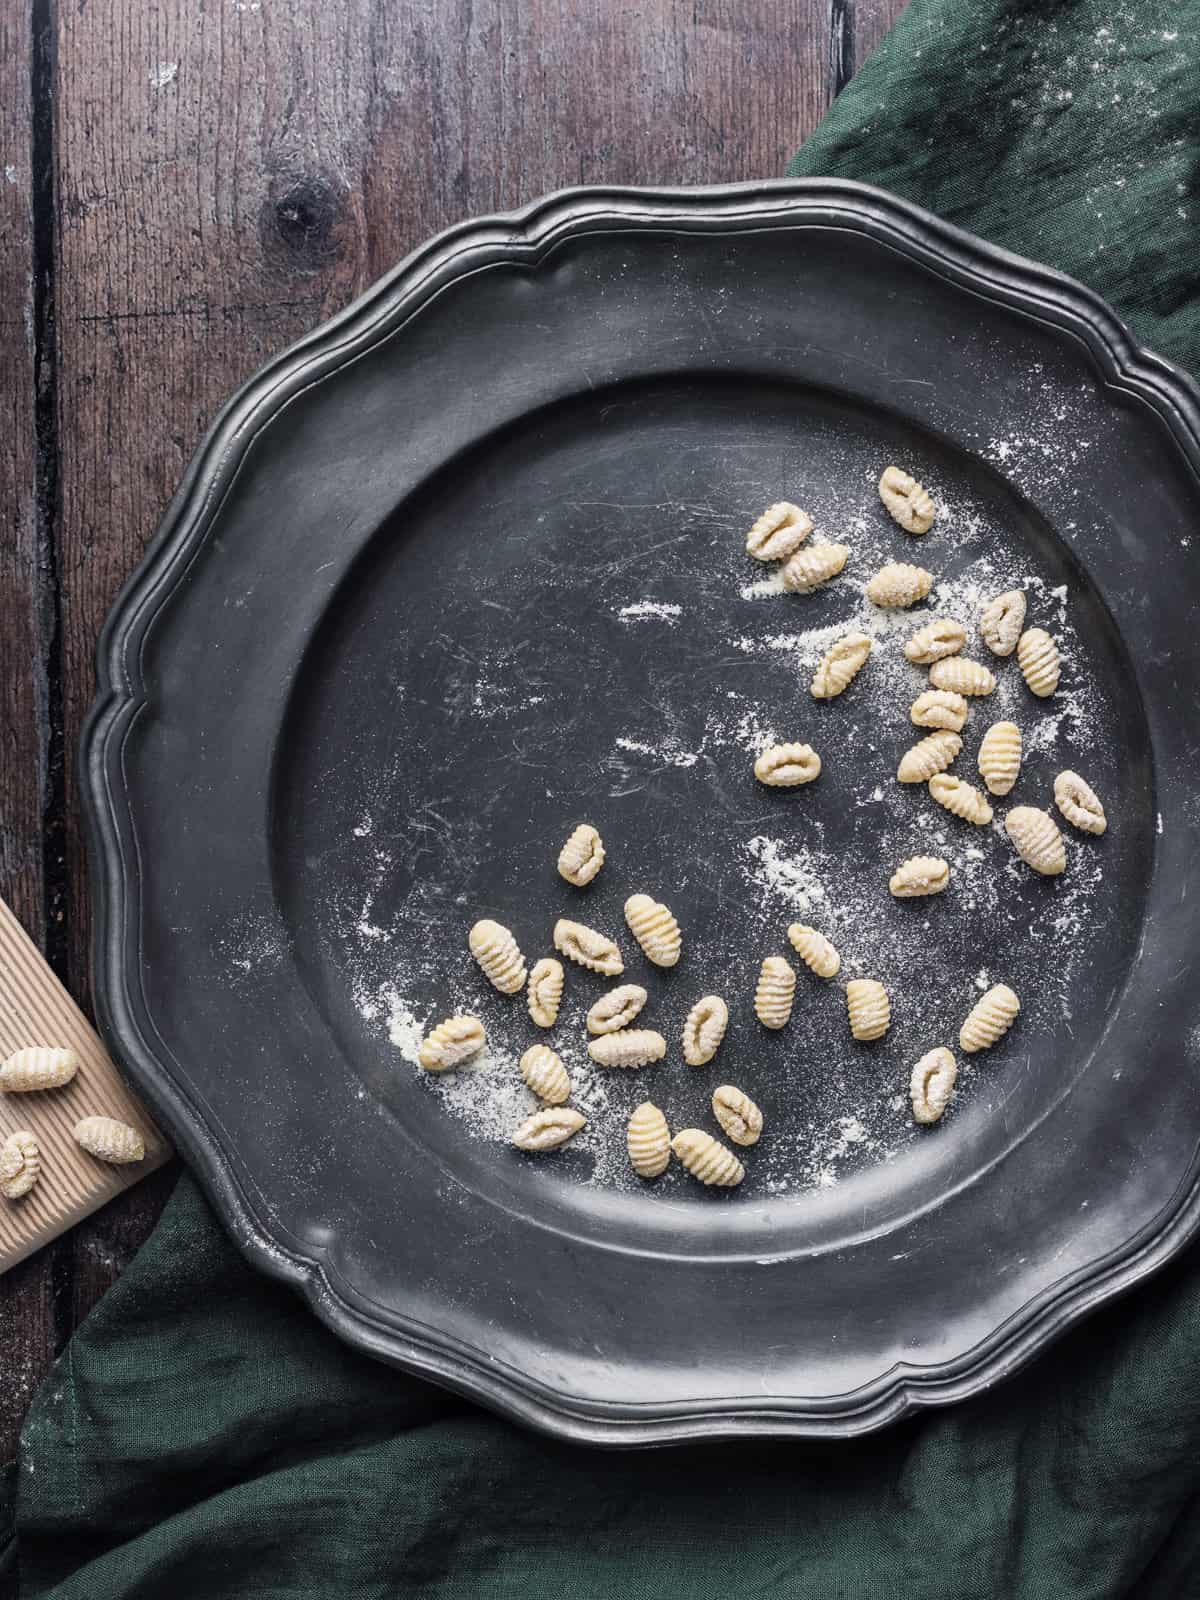
- Dust the gnocchi Sardi- Once the gnocchetti has been shaped, is essential to dust them with some semola to prevent them from sticking to each other.
FAQ
After kneading the ball it should be smooth, and elastic but not too soft.
The traditional gnocchetti Sardi are made in semola rimacinta di grano duro. However, some villages in Italy use flour "00"," 0", or even wholemeal flour. Note that the amount of water will vary, as every flour has a different amount of protein.
It is so simple, use a fork or a grater to shape them. Place the fork on top of the small gnocchetti and roll it over with the tines of the fork. If using a grater, place the gnocchetti sardi on top of the grater, and with your thumb roll the piece through it.
Gnocchetti or gnocchi Sardi have an al dente texture, thanks to the use of semola rimacinata flour. They have a delicate taste that goes so well with any kind of pasta sauce.
The gnocchetti will be ready when are all floating on top of the water. They will take roughly 4 minutes to cook.
The gnochetti should be al dente, this texture is given from the semola flour. However, it should not be stone-hard.
No. Cook them when still frozen in boiling salted water, they will take a little bit longer to cook
Yes, of course. If you are making them just for 2 people use a half dose.
More pasta recipes
Looking for other recipes like this? Try these:
📖 Recipe
Gnocchetti Sardi
Equipment
- 1 wooden board or large bowl or a stand mixer
- 1 Fork to mix the water and semola
- 1 sharp non-serrated knife or a steel rigid bench scraper
- 1 wooden gnocchi board or fork or a grater
Ingredients
Gnocchetti Sardi
- 400 gr Semola rimacinata di grano duro
- 200 gr still water room temperature
Instructions
Using a wooden pasta board
- Spill the flour on the work surface and make a well in the center. Pour the water inside the well and with a fork or hand, slowly incorporate the semola and the water. Once the all water is been absorbed, using your hand start making a rough ball.
Using a large bowl
- Tip the flour into the bowl and make a well in the center. Pour the water inside the well and with a fork or hand, slowly incorporate the semola and the water. Now you'll have a crumble texture and using your hand start making a rough ball. Make sure to scrap any bits left on the side and the bottom of the bowl inside the dough. Tip the rough ball on a clean surface.
Using a stand mixer
- Add the semola and water into the bowl and start the machine at medium speed. Work with the paddle until the ingredients are all merged and you have a rough ball. Tip it on a clean surface.
Knead
- Knead the ball on a clean surface and work it for 10 minutes until is smooth and elastic. Make sure that the dough has absorbed all the flour left on the surface.
- Cover* the gnocchetti dough and let it rest for 30 minutes.
Shape
- Cut one section from the dough with a sharp non-serrated knife and cover the rest.
- Roll* the section into a long rope 1 cm (0.3937 inches) thick. Cut* the rope into small gnocchi of 1 cm (0.3937 inches) wide with a sharp non-serrated knife. Take one gnocchetti Sardi and place it in the middle of the gnocchi board. With the side of your thumb roll the piece through the board to create that beautiful shell shape. Move the gnochetti aside and continue with the rest of the dough.
- Once you have finished cutting the rope and shaping the gnocchetti make sure to lie them on a surface dusted with semola so they don't stick .Once they have all been shaped you can start by making the sauce.
Cooking the gnocchetti
- Bring a large and tall pot with plenty of water to boil on high heat. Add a handful of coarse salt and tip the gnocchetti on it. Cook* the gnocchi for 4 minutes.
- Once the gnocchetti pasta is cooked add your favorite sauce and mix to combine.
Notes
MAKING THIS? I'D LOVE TO SEE IT!
Follow me on Instagram and tag your snap @fedetheclumsychef. Follow me on Instagram and Pinterest!Follow me on Instagram and tag your snap @fedetheclumsychef. You can find me on Pinterest too!

Bianca says
These were so much fun to make! Made these with my roommate as a weekend project and we made the pink sauce as yo suggested, soooooo delicious!
Tressa says
Trying this out for the first time and your Instructions were so easy to follow. Mine were pretty as yours. Thank you for sharing.
Elizabeth S says
This recipe is so well written. I was nervous at first but you really walked me through it and they turned out just like yours! The pictures were so helpful too. Oh and the taste was light, fluffy, and perfectly cooked. I tossed mine in a lemon pesto sauce.
Jane says
So delicious and so easy to make them. I was surprised of what you can do with just water and flour.